Showing posts with label DIY ideas. Show all posts

Wednesday, December 17, 2014

Salt Dough Ornaments

I don't get those DIY blogs that have a fancy "themed" Christmas trees every year, with new coordinating colors, or brand new ornaments. What do they do with all the ornaments they've made, collected, or been gifted? Keep them in storage? That's no fun.

That said, I was a little bummed when I saw how my these salt dough ornaments were turning out last year, once my then-2-year-old started mixing up the paint I'd laid out for him. They were turning out that olive green/brown/khaki color that happens when every paint color ever gets thrown into the mix. I remarked to my sister that we were going to have the ugliest tree ever this year thanks to these monochromatic ornaments.

We painted them on Christmas Eve last year, so once they were dry, they were packed up until we took them out again this year. But when we opened the ornament box the day after Thanksgiving, inspiration struck. Glitter saves everything.

I hit all of the painted salt dough ornaments with a couple blasts of Rustoleum "Intense Shimmery Finish" in gold, and, like magic, I all of a sudden loved these ornaments (which had started to grow on me anyway, I mean, my baby painted many of them!)

We strung them up on some butcher's twine (a.k.a. a fancy word for white and a colored strand of string twisted together) found in Target's Dollar Spot section. Thank goodness, too, because our tree would be pretty bare if it weren't for the addition of these ones. I think our theme is "sentimental."
How to Make Salt Dough Ornaments and Handprint Ornaments:
Dough ingredients:
One part water
One part salt (pretty sure you need to use iodized salt, i.e. not Kosher salt)
Two parts flour

Mix together ~10 minutes to form a soft dough. Roll out to desired thickness and use cookie cutters or butter knives to cut out shapes.

Once we got a couple of handprints of each of the kids, we cut circles around those and use rubber stamps to spell their names and the year, pressing the stamps into the dough. Then we let the 2-year-old go to town on the rest of the dough, treating it like Play-Doh. He used his Play-Doh cookie cutters, which gave us shapes of fish, flying saucers, and birds. He also pressed some of his Cars toys into the dough.

We used a straw to cut little hanger holes in the top of each ornament, then popped all of the ornaments into the oven on cookie sheets and baked them at 200* until they seemed nice and firm.

A couple of days later we painted them using acrylic craft paints. I painted the handprints solid white and filled the names in with a gold paint pen. Those ones were sealed with Modge Podge.

Then we had a painting party to paint the rest of the shapes, which didn't come back out again until this year!

Sunday, December 14, 2014

Wedding Invitation Ornament

Awesome DIY gift idea for bride and groom
This is why I could never be a pro blogger: this is a project from last year.

I knew I wouldn't get this DIY gift idea posted in time for Christmas, so I thought, I'll just hang on to the pictures for next year. And, holy crap, it's already next year.

Am I the only person who feels guilty throwing things like wedding invites away? I mean, they spent so much money on it! I don't keep a scrapbook, and even if I did, why would I want someone else's wedding invite in it? And they presumably already have their own copy, so you can't just, give it back. Unless! You shred it up and stick it into a glass orb!

Seriously though, this is the perfect kind of DIY gift that doesn't have that kitchy homemade vibe, and even if it does, your gift recipient only has to look at it once a year. This wedding invitation ornament was for my brother and his wife, who got married last year, and I'm pretty sure my SIL liked it a lot. Plus, since they're newlyweds, I'm sure they could use more ornaments for their tree anyway-- my husband and I have been together for 14 years and even we have a pretty bare tree.


How to Make a DIY Wedding Invitation Ornament:
Supplies:
Wedding invitation (duh!)
Clear glass (or plastic) ornament
Craft knife, cutting mat, and ruler (recommended) -or- scissors and a pen
Ribbon to hang the ornament
Other decorations such as glitter or confetti (I used a heart-shaped punch)

Method:
Just slice the invite into strips with your ruler/mat/craft knife, or cut into skinny strips with your scissors. The strips can be uniform, but I varied mine in width and made sure to get the important names and dates all on one strip.

To curl the strips, wrap them around your craft knife or pen, then stuff all the paper curls into the glass bulb. Arrange them as you go in case it gets too packed to wiggle the couple's name back to visibility.

You can leave it plain, or toss in some coordinating glitter. I punched red hearts out of the invite's envelope, and bonus! The invitation came with a bow around it, so i took the ribbon off, ironed it nice and flat, and used it as the ornament's hanger.


I think this blogger was the first to do this, and I'm so glad I found her tutorial. I'm particularly fond of these clear glass balls now, and since I had to buy a four-pack, I have three more to fill up. Although, to be honest, I don't think it's going to happen this year. ;)


Saturday, November 8, 2014

Kermit the Frog quilt

I made a quilt for my first son's 1st birthday, so I couldn't not make my second son one too...even though neither of them will remember said first birthdays!

The difference is that this quilt was made almost entirely from stash materials, I only had to buy a little bit of  navy and green leaf-print fleece, maybe a yard and a half or so, to cover the entire back.

Everything else I already had; Kermit quilting cotton from the thrift store, a jelly roll by a brand called Stripz purchased on clearance from WalMart, and Kermit fleece I only bought because because my dream Muppet fleece was out of stock.

This Muppet quilt ended up long and narrow, just like my string-bean shaped baby-- kind of in-between toddler and twin sized.

I still hate how much static electricity fleece generates, but I'm starting to warm to it because I find it so darn easy to work with.

The top is just a random, er, "design" I came up with (I just sewed strips and slashed here and there until it resembled a rectangle). There is no batting, but I decided this will be my last quilt that I do that.

For the quilting I did double random lines, my first time trying random line quilting. Also my first time using spray basting and I am a total convert! In fact, I'm thinking of going back and re-doing my two other most recent quilts to eliminate puckering...


Tuesday, November 4, 2014

DIY Catwoman Mask


Happy late Halloween!

I love sharing my random Halloween creations with you, even though it's usually after Halloween.

This year for the first time ever, my kids ended up with totally storebought costumes, which I had mixed feelings about. I prefer DIYing at least part of their costumes (cheaper, more sentimental, can use it more than once, no one else will have it, etc), but at least Halloween costumes today are cooler than the plastic tunic-and-mask combos from when I was a kid.

My three-year-old orchestrated everyone's costumes this year. He chose Spider-man for himself, Incredible Hulk for his baby bro, Catwoman for me, and Ironman for my husband. (Shhh, I won't tell him Catwoman is the wrong "franchise" if you won't. Yes, are people in my FB feed who care about this kind of thing.)

It was the first time in years that I got to dress up, and even though I didn't get to make my kid's costumes, I did do somewhat of a DIY Catwoman costume for myself.


Catwoman is a very easy Halloween costume, and there is a lot of inspiration to choose from-- 60s TV show Catwoman, 90s Tim Burton Catwoman, comic book Catwoman, Halle Berry or Anne Hathaway Catwomen. I was leaning toward the 60s one but really, I just threw a bunch of stuff together.

I'd planned on making black leggings but ended up wearing black skinny jeans, black boots, a black long-sleeved tee, and a storebought cat-eye shaped mask that I found at Spirit. The DIY Catwoman Ears were the only thing I ended up making...
  • I used black felt from Jo-Ann and bought enough I could experiment with it.
  • This is my inspiration and this is the tutorial I vaguely followed for the hat part, minus all the steaming and felting.
  • I cut three pieces for the hat part; a long strip and two vaguely half-circle shaped pieces, which I cut freehand.
  • Stitch together using this tutorial.
  • To get that widow's peak look, I just put my hat on and drew the outline I wanted, or the shape of the hat I wanted, with fabric pencil.
  • I trimmed along the outline (while the hat was folded in half so that it ended up symmetrical).
  • Since I had just cut away some of the stitching, I sewed a seam around the hat, about 1/8" of an inch from the edge, to keep it from coming apart.
  • For the ears, which did end up looking more Batman than Catwoman, I cut out four triangles, sewed them right-sides together down the top two sides, and turned them.
  • I stitched the ears to the hat along the third side of the triangle that previously had no stitching, but I did have to do a small bar tack at the base of each ear on the opposite side of the sewing to get them to stand up.
There you have it! A vaguely DIY Catwoman hat which actually looks more Batgirl because of the ears, but I think it gets the point across! Now we're in full-on holiday mode around here.

Friday, August 29, 2014

DIY French Memo Board tutorial

For some reason I felt especially accomplished with this post. I think it's because I wasn't just stashbusting and using up spare craft supplies, I was also fulfilling a need we had.
For as long as we've lived here, I was planning on putting a bulletin board over the bookshelf in our boys bedroom to hold mementos like postcards, ticket stubs, and birthday cards. After consulting with Google on searches like "boys bulletin board", I figured one of those ribbon bulletin boards, or "French Memo Boards" as I learned they're called, was just the ticket.
I especially loved that I got to use a super-fun comic book themed Star Wars fabric-- getting it out of the stash, and on display on the wall. I also harvested a stretched canvas from an unused flannel board (pro-tip: just ignore those little tutorials out there that tell you to use flannel as the base for your felt-boards. USE FELT.)

I did have to buy a couple of things: ribbon and buttons. Both were on sale but unfortunately now I have to use up the rest of those. Everything else came from the stash.
Yay to getting projects ticked off the list! Yay to using up stuff that's otherwise just sitting in a drawer! (See what I mean about this week's sense of accomplishment?)
Have you made one of these ribbon bulletin boards before? They're actually super easy and can be done in an afternoon-- which, of course, added to the I'm gettin' stuff DONE feeling. I made a How to Make a French Memo Board tutorial video if you'd like to try one:

Friday, July 25, 2014

DIY Superhero Cape from an Upcycled T-shirt


In this week's YouTube video, I show you how to make a superhero cape out of an old T-shirt. This is a super easy and fast project with satisfying results. All you really need is an adult-sized t-shirt and some scissors-- everything else is optional!

Two weeks in a row with projects for son. I'm about to lose my "Selfish Seamstress" cred!

Wednesday, June 19, 2013

DIY Utensil Bouquet

I plan to do a round up post in the future with all of my favorite somewhat-homemade and DIY gift ideas, so I thought I'd post one of my favorites so far.
A utensil bouquet makes a great housewarming, bridal or baby shower gift, or maybe even wedding gift if you go really over the top with it. As you can see,  it's basically a gift basket made to look like a bouquet, or in my case, a pot of flowers. It can take an inexpensive or ho-hum gift like utenstils and make it more memorable or visually appealing.

I simply purchased a flower pot, some utensils from her registry, and some dish towels to match her kitchen's color scheme. I used floral tape, shish-ka-bob skewers, and turned the dish towels into flowers. Then I just arranged everything in the flower pot to look like a bouquet. Some paper crinkle grass/gift basket filler (what is that stuff called?) holds everything up nicely. And I almost forgot; I lined it with some coordinating tissue paper first, standing it up a little around the sides. Ribbon finishes it off.
utenstil boquet
For a baby shower, you can use baby washcloths and onesies to make the flowers, and things like bottle scrubbers could also make up the bouquet... while kitchen timers and measuring cups tied to the side would look adorbs for the new bride or as a house warming gift.

What about you, do you prefer to DIY your gifts?

Monday, April 8, 2013

Fabric dyeing: revamping ruined bedding

Recently, the Lifetime Moms Facebook page, or some other similar FB page, had a status update about how it would be nice if "your husband does the laundry once in a while."

Aside from being annoyingly sexist by assuming all families have traditional gender roles (or even that all moms have husbands), it just wasn't true... I HATE it when my husband does the laundry. Mostly because, in my opinion, he does it all wrong. But all other housework, besides laundry and cooking, is actually my husband's domain as he's such a neat freak. Unfortunately that means if I let the laundry sit around for a little too long, my husband's clean freak nerve starts twitching and he gets to washing. Which brings us to today's post.

I love discounted high end bedding, especially the percale weave Ralph Lauren bedding you can often find at TJ Maxx. But I also professed my love for mismatched and shabby chic bedding. Rachel Ashwell's Simply Shabby Chic line at Target is kind of a perfect blend of the two, except several years ago it was still pricier than the Ralph Lauren bedding at Ross. I think the Target bedding is still a great value, as long as I wait for it to go on clearance or at least on sale.

So it was a big splurge when I bought this amazing coverlet at Target back in, oh, 2005 or so.
Ugh, I love it just as much even today. Target doesn't even carry it anymore, I had to find this picture on eBay. I believe the print is called "ditsy daisy."

Anyway, the splurge was huge because I also bought some pink floral bedding to go with it, which Target amazingly still carries (but not online, so I can't link it). I think I spent something like $80 or $90 for the whole she-bang, which was a big deal because I was in college at the time. My husband and I weren't even married yet.

We used it on our bed with the coordinating sheets just once, when my overzealous clean freak then-boyfriend somehow managed to do this to the coverlet...
bleached out blanket
The entire thing was bleached out! I still don't know how he managed to do that (I was too broken-hearted to ask at the time), and when I asked him recently how exactly it happened, he had no idea what I was talking about. It had been three moves since he'd seen this blanket, and, after all, it had only looked like it's previous incarnation above for a very short time.

The bleached out version really doesn't look so bad in these pictures; it's almost even kind of appealing. I blame my camera. In real life, it was not. cute.

I'd already planned on dying most of our bedding to coordinate with each other, and knew if I dyed this coverlet a light enough color, the bleached out flowers might still show through.

I usually tend toward pinks, blues, and purples for our room, but I decided to go with yellow after pinning these images:

I love these two images (I think it's the same bedroom snapped with a different camera), and thought the yellow would couple nicely with the orangish hue the flowers on our blanket had become. (I could not find a source for the pictures outside of random Tumblrs and re-blogged pages; if you know who took this pictures please tell me as I prefer giving proper credit where credit is due.)

I went with Rit Dye this time, because I already had some Sunshine Orange on hand, and opted to dye in the washing machine since I was working with such a large piece. I bought a bottle of Lemon Yellow and added the entire thing to the dye bath, and poured in a small amount of the orange. At first, I thought the orange might've been a mistake, but I actually quite like how it turned out.

rit dyed bedding
Granted, it doesn't look so saturated in this collage, but again, I'm blaming the camera. It's a very sweet yellow closer to nacho cheese than to butter in real life, but I like it.

There's a length of blue scallop stitching around the end that not only didn't bleach out, it didn't turn yellow. So, obviously the thread is synthetic. It doesn't really "go", but it's not that noticeable.

mismatched bedding
The pillowcases in the back are the original pink Rachel Ashwell ones I purchased to go with this coverlet. The front ones are authentic vintage feedsack pillowcases I nabbed from my mom's house-- I usually ask before claiming goods that aren't mine from my parent's house, but these weren't being used and I didn't want them to get ruined, plus I just love them! I think they came with the house when my parents bought it in the 90s. They live in a 1906 farmhouse on an actual ranch, so perhaps these really did hold feed at one time!

Wednesday, November 14, 2012

Orange pomanders: an instant gratification craft

Or should I call it "instant craftification"?
Actually, making an orange pomander isn't technically an instant gratification craft, because you're supposed to let them dry out for as much as eight weeks in a paper bag before enjoying them. I don't know if the smell is supposed to get stronger after that, or what. Or maybe it's supposed to dry out better that way.

Either way, mine already smell great and look pretty cute too. I'm breaking the rules and letting mine dry out in the open; that's how I roll, yo!

Different variations of the pomander have been around since at least the Middle Ages, as they apparently came in handy for disguising body stank. Modern orange pomanders are basically oranges with some cloves stabbed in them. I decided to title this post "instant gratification" for that reason; no stitching, no gluing, no planning, cutting, painting. Just a gal and her produce. And spices. (Although all that stabbing can be time consuming; I did these three over the span of three evenings.)

Most orange pomander instructions have you start out by decorating your citrus with yarn, or whatever you feel like. Then they have you stab holes with a knitting needle. I was not going to wreck any needles for this, so I used a shish-ka-bob skewer, and it worked very well... until I realized I didn't need to pre-poke the holes. The cloves stabbed in quite easily on their own!

Many instructions have you either drop your completed pomander in a paper bag with some spices and shake it around to coat; I thought mine was too delicate. You can also roll yours around in a spice mixture, and I tried this (I used pumpkin pie spice) for my first one, but thought it looked "dirty". So the next two don't have any additional spices.

Finally, I read at least one recommendation to finish the pomander off with a preserving essential oil, like sandalwood; I skipped this as well, so mine ended up being basically some oranges with fabric tied around them and cloves stabbed in them. Easy-peasy! Or easy-orangey?

Have you made pomanders before? I totally recommend this festive and easy craft!

Wednesday, October 24, 2012

DIY shutter chalkboard and message center

shutter messaging
We have a bunch of shutters in our garage thanks to my husband's job as a window coverings installer. As you can imagine, we're trying to come up with ideas for vintage window shutter crafts so we can put all these vintage shabby shutters to good use.

Some of the shutters are in better shape than others, so for this project, Lance took a couple that had the louvers falling out, and knocked them the rest of the way out. Then he added a board painted with chalkboard paint to the back, and Bob's your Uncle, a shutter chalkboard is born. These two were painted with spraypaint and distressed, but mostly just because we didn't want to put a white shutter on a white wall.

We hung one shutter message board horizontally in the entryway, and the other vertically in the kitchen. (Recognize the quote from the green one? It's from Ratatouille!) The remaining louvered side can be used to display postcards, greeting cards, bills, or children's artwork, attached with clothespins.

Wednesday, October 3, 2012

Before & After: Pie Safe Makeover

china hutch before
Here is the makeover of a recent estate sale purchase...

china hutch after
It might be more appropriate to call this a "China Hutch Makeover" or a cabinet makeover of some sort... I'm not really what this piece of furniture started out as. A cabinet with legs. It did have glass in the doors, along with some wood decoration behind the glass, but my overzealous husband took those out before I could take the before photo.

I replaced the glass with a wire mesh after deciding chicken wire wouldn't be sturdy enough, so it definitely ended up more "pie safe" then "china hutch", so that's what we're calling it! The mesh also matches my food pantry.
pie safe
What do you think? The interior is some kinda off-white discount paint from the "oops paint section. If you recognize the outside, turquoise color, that's because it's my Behr Mint Majesty leftover from the dining chairs... kind of. I had to add some more oops paint, this time in a blue, in order to stretch it to have enough for another project. Plus, since this turquoise china hutch is in my kitchen, I didn't want it all match-matchy with my dining chairs.

I found a birdcalling book at the thriftstore, but the bird call mechanism was broken while the illustrations were awesome. So, I totes "Put a Bird On In It", lining the drawer with the bird pictures.

I'm usually not for painting over wood (unless it's 80s yellow/orange,  or 70s speckled brown), but this wood was all discolored, chipping, warped, and all around in bad shape. So much so that I got this for just $20 (and a second one for the same price) at an estate sale.
pie safe before after
The cabinet was $20 and the paint I had on hand. The only thing I bought new was the hardware (from OSH) and the wire, which also came from OSH and ended up a much better deal than the ol' Orange Big Box, because they let you buy it buy the foot at Orchard.

Wednesday, July 25, 2012

DIY chalk paint dining chairs

After the dining table was completed and in place, it took us weeks to find dining chairs. I was set on finding some metal Tolix style knockoffs, and was probably going to buy some from Overstock.

But then my husband brought home four chairs from a yardsale for just five bucks for the lot.  Yes, the same husband ( I do only have one, afterall) who bought two desks for $10 from a different yardsale.

The four chairs were three matching blond/yellow wood ones (sorry, I forgot to take before pictures!) and a fourth black one (that one lives by the computer now).
behr mint majesty
I've already mentioned our small dining area is a challenge to find furniture for, and it was going to be an even bigger challenge to find the right-sized chair for the teeny dining table.

My husband had intended these chairs to be temporary, and I agreed; I hated their yellow-and-mildew color tones!

But as time wore on, I realized they were just the right size. And, we already had them anyway... time to mend and make do.
mint chalk paint chairs
First, I tried spraypaint. The Rustoleum Satin Green Apple just wasn't the right shade OR finish. So the lone spraypainted chair sat outside for a few days before I decided what to do next. That decision came to be chalk paint.

I probably don't have to tell you that Annie Sloan Chalk Paint is taking the web by storm. I was totally surprised to find that there's an AS retailer in my town, and was all prepared to pay for it.

But then, I got to thinking... I guessed it was around $35 bucks for a quart of Annie Sloan, and I was pretty close. These chairs were just $1.25 each. It seemed to sort of go against the frugal find that they were if I were to cover them in expensive paint. Plus, there wasn't the right shade of minty green on the AS color chart.

I'd already been seeing all the DIY chalk paint recipes when this post popped up on Apartment Therapy. Most recipes have you mix Plaster of Paris, water, and latex paint in precise measurements and ratios, but the one on AT said the gal kinda winged it until she found a consistency she liked. Works for my lazy artsy, go-with-the-flow self.

I planned on using the lines on the side of my quart container to make pretty precise measurements, and filled Plaster of Paris up to the first line. I thought I was putting water up to the second line when I noticed there was way too much water.

Instead of dumping out the water and PoP to start over like I should have, I went ahead and added my paint, Behr latex paint and primer in one in the color "Mint Majesty". It took a lot of paint to catch up to all the water, and I got a very watery DIY Chalk Paint mixture to work with.

Still, I loved how my first chair came out. I'd done minimal sanding and hadn't technically primed it, which is a supposed benefit of chalk paint-- especially if you're using the real Annie Sloan deal. But it HAD been painted with that apple green Rustoleum, which was acting like a kind of primer.

The next two chairs were another story. With having a little one, I didn't get to do all three at once. So my DIY chalk paint mixture sat overnight. Maybe I should have Googled whether or not leftover DIY chalk paint keeps.

By the next day, the PoP had settled to the bottom in a thick layer. The water was on top. I mixed it up and started painting anway.

I love the color of all three chairs, although I think the first one came out more saturated because of the layer of apple green underneath. But the second two also came out with some large glops of PoP here and there thanks to the day-old mixture. There are brush strokes on the seats, while the first one came out with a smooth seat.

I distressed all three before finishing them off with a couple of layers of Minwax pastewax.

The verdict: I might use DIY chalk paint again, but not for any projects I have in my current queue. This hasn't turned me off from trying the real ASCP, but I think the price for AS has. I like my Behr latex paint and primer in one and plan on mostly sticking with that.

Tuesday, July 24, 2012

Before & After: Dining Table Makeover

Our dining area in our small eat-in kitchen is a challenge to get just the right-sized table for.

We'd first bought an awesome mahagony table off Craigslist for just $40... and it ended up being way too big.
farmhouse table before after
So we snatched this table up when we saw it at the thrift store. It was priced higher than I wanted to pay for a rinky-dink table like this, even on sale, but it was the right size for the space.

My husband chose to remedy the yellow/orange wood with a coat of dark stain on the top using an all-in-one stain/poly, and spray-painted the base white. Now we have a perfectly-sized little table, and we didn't have to sacrifice looks to do it.

Tuesday, May 22, 2012

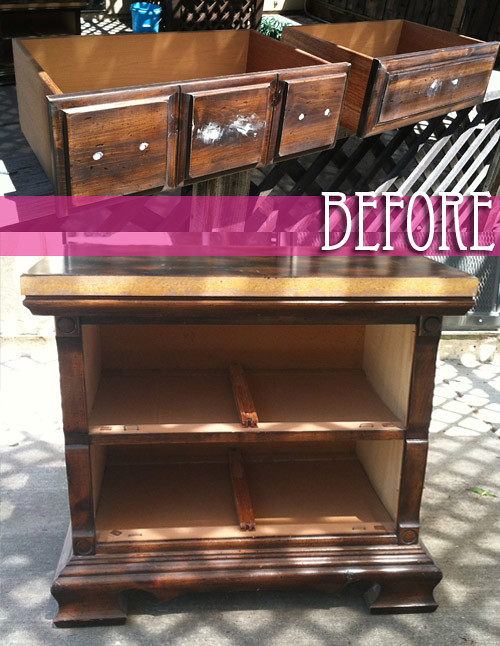
Before & After: DIY Vintage Nightstand Makeover

nightstand makeover before
Shabby chic: ya either love it or ya hate it.

I happen to love it... as long as it's not total overboard like you're living in some countryside Northeastern (1980s) bed and breakfast. I like the muted whites and florals that the look is known for, but I also love color and other graphic prints too much to go full-on with it.

And of course I love vintage, retro, antique... just plain OLD stuff. Always have. So that's perhaps what I find most appealing of all about the SC aesthetic. The aged, loved, worn, and yes, distressed (even it's it's faux distressed) fabrics and woods.

Don't be hatin'.

Among the old things I don't love: 1970s veneer. So when I bought this nightstand, I full intended on painting it all along.

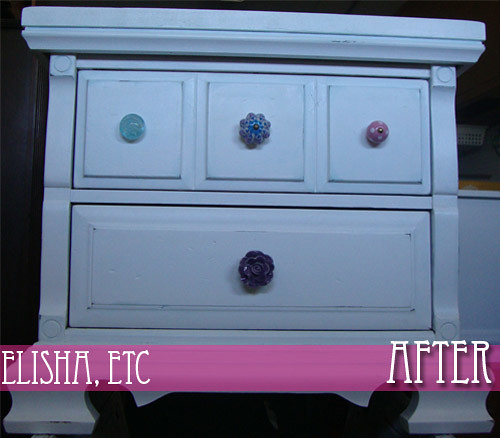
And here she is now!
nightstand makeover after 2
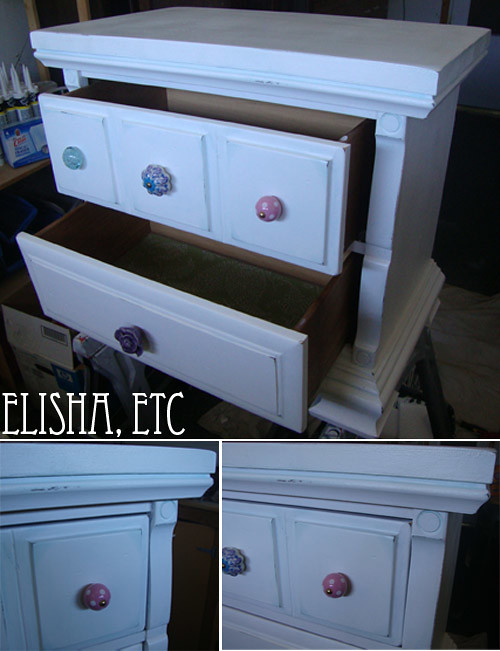
I know you've seen these "white with distressed paint" makeovers all over the blogosphere so it's nothing really special, but I'm really happy with it!

It was my first attempt at making over a piece of furniture. Oh, I've painted plenty of stuff, but I've never sanded, primed, chosen new hardware, done specialty finishes like faux distressing and blue washes, then sealed.

My previous endeavors were "paint over the old paint until you can't see said old paint any longer aaaaannd.. done".

It'll now live next to my bed and probably hold some sewing stuff spilling over from my craft nook. I hope I get to do more projects like this in the future! nightstand makeover after 1

Wednesday, April 18, 2012

DIY Retro Bread Box

I've wanted a vintage-style enamel bread bin but can't quite seem to afford one. You know the ones; white or pretty pastels with the word BREAD emblazoned across the front, lest we forget what to store in there. ;)

I racked my brain for a while on how to paint letters onto a readily available metal bread box. What kind of food-safe enamel paint would go on neatly? And how do I get it to not look so much like a stencil, just like my inspiration?

I found this cute retro bread box at Target, and although the garage-door-style opening isn't exactly the style I wanted, but I couldn't pass it up for the price.

And now, the solution to retro-fy it... vinyl stick-on letters. They're a true black and a good font for the look I was going for. They're just permanent enough, but not too permanent that I couldn't preposition them. Yes, they're crooked in the picture below. That's the beauty of it; after this picture was taken, I straightened them out. And then was too lazy to re-take the picture.

These basic black ones I found at Wal-Mart in the poster section for I think about $3.99, maybe even $2.99. But I saw similar ones at Office Depot in different colors and fonts, which might be fun to try also!


DIY Retro Bread Box
Materials: bread box ($17.99 - Target), vinyl letters (~ $3.99 - WalMart)
Total cost: Under $25

Tuesday, November 1, 2011

DIY Nursery Letters

When I was a kid, I was always super disappointed whenever I perused personalized souvenirs. You know the ones; keychains, license plates, and shotglasses that come already emblazoned with common names. I could never find my name.

So now, I love the chance to personalize anything I can. That's carrying over to purchases for my son, too. So even though nursery letters are becoming pretty cliched, I still wanted to make some. In fact, since his first name is so short, I decided to plow forward into his middle moniker as well.

They're pretty straightforward, so I'm not going to insult your intelligence with a tutorial. I wanted the "cobbled together and collected from various sources" look, so they intentionally have different fonts and paint designs.

UPDATE: I've had lots of people landing here looking for ideas to DIY their own, so even though I didn't photograph a tutorial, here's a list of what I did (see below the new picture for a list of tools and materials):
  1. Shopped at local craft and hobby stores (and one big box chain!) for mismatched letters.
  2. Sketched out the letters on paper (see the new picture below), and drew designs on the letters so that I wouldn't have the same patterns too near each other.
  3. Came up with a color scheme, and just like the patterns, sketched it on paper so I wouldn't have too much of the same color too near each other.
  4. Lightly sanded the letter with a fine-grit sandpaper. I was mostly looking to smooth out the manufacturing imperfections.
  5. I considered priming them, but didn't! I got right to painting the base coat on each letter. Some took more than one to get the base as dark as I wanted it.
  6. Once they'd dried, either free-handed the next design layer, or started applying painter's tape. (TIP: paint the base coat over the painter's tape before changing colors. This'll keep the second color from seeping under the tape).
  7. Finished each one off with a layer of clear spraypaint! DUNZO.
DIY Nursery Letters
Acrylic craft paint on wood
Letters: From Richard's and WalMart, $1.99 - $2.49 each, approximately $18 total
Paints: On sale for 50 cents each at JoAnn (Purchased in Navy, Cobalt, Orange, White, Black, Yellow, Red, then mixed)
Foam brushes: $1.99 at JoAnn
Crackle medium: $2.49 (Used on letters "T" and "L")
Clear spray paint finish: About $3.69 at WalMart, KRYLON in Satin
Total project cost: Approximately $29

Comments system

Disqus Shortname