Showing posts with label sewing projects for the home. Show all posts

Wednesday, July 3, 2013

DIY pillowcases; pretty and vintage inspired

Welp, it's no secret that I love mismatched, vintage-style bedding so I decided to make myself some pretty pillowcases.

Mismatched bedding

It feels a little silly to take apart actual vintage pillowcases for fabric, then turn around here and make vintage-inspired pillowcases from new fabric-- and I guess I don't really have a good explanation for it, haha. Other than, I've really been wanting a vintage sheet quilt and bought the pillowcases in my previous post just for that purpose. I did think twice before taking those other pillowcases apart, though.

Sausage pillowcase

Here, I saw this purple floral quilting cotton at JoAnn and fell in lurve with it. I put off buying it forever, until it ended up in the clearance section. I eventually bought the rest of the bolt, a little more than 2 yards, for less than two bucks a yard! The JoAnn branch in my city was relocating, so they had all of their fabric on sale on top of the regular deals and sales-- I pretty much got this stuff on triple-sale. I wasn't exactly sure what to do with it, but was kinda thinking pillowcases all along.

DIY vintage pillowcase

The mint was a remnant in my stash, and I purchased clearance rick rack for 97 cents. My first successful rick-rack application, I think. I just love it when other people use rick rack and I'm often inspired to try it whenever I see a cute project that includes it, but somehow every time I touch the stuff it turns into this corny Becky-Home-Eccy looking project. I think one reason it works here is because it's so subtle. The trim barely peeks out from the cuff, adding some vintage detail.

Pretty pillowcases DIY

These are super easy if you're inspired to make your own! I know, you're thinking, well duh, how hard is a pillowcase going to be? I think a pillowcase is one of the first things I ever sewed, after all. They're made using a method that creates no exposed seams. You can find a tutorial by doing an Internet search for the burrito method, sausage pillowcases, or turn-tube or tube pillowcases. Various names for a method that accomplishes the same thing. Mine came together in well under an hour, not including pressing and cutting. I know there are more in my future!

Thursday, April 11, 2013

Sewing project: bandanna pillows

bandanna pillows

bandanna pillows closeup
These pillows have a zipper opening at the bottom, unlike my previous bandanna pillow (pictured below), which had a split opening on the back. I think next time I'll return to the split opening. I also just stitched around the edged as opposed to the bias tape edge on the previous one. One thing I did again was interface the bandannas first; they're just too flimsy not to!

The smaller brown one is not a bandanna, in case you haven't guessed. I quilted it to tie the color scheme in the other two pillows together. Bandana pillow

Wednesday, January 30, 2013

Sewing project: appliqued monogram towels

applique towels
I am so behind on posts! I made these last month the day before Christmas Eve. Talk about a last-minute DIY gift idea!

My brother is getting married this year, so I kind of wanted to do something "coupley" for his and his fiance's gift. It was no surprise that when I searched "Christmas gift ideas for bride to be" and variations thereof, monogrammed anything was a popular suggestion.

I don't have an embroidery machine, so a typical monogram wasn't going to cut it. But I had plenty of "Steam A Seam" leftover from the Christmas stockings, so I decided to give appliqueing a shot for the second time ever.
more applique towels
To make this project, I just picked a basic font, sans serif to make the appliqueing easier. I typed out the letters I needed in Word and printed them out to use as stencils  From there, it was just a basic appliqueing process, adhering the Steam A Seam to the back of the fabric, cutting out the letters, ironing them to the towels, then stitching them in place with a very tight zig-zag stitch.

These pictures are so horrible! I came up with this project the day before Christmas Eve, bought the towels, then did it all in one afternoon, then quickly snapped pics before wrapping them. The pictures were taken at night near my sewing nook, so the only lighting is the yellow-ish CFL bulbs from our ceiling fan. I promise the colors look better in person.
applique towels2
All in all, I think applique monogram towels are one of those perfect DIY gifts that fuses store-bought with a  homemade touch. They're quick, but still have that personal touch that you get with an entirely homemade gift. Also-- they're practical. I'm sold!

Wednesday, December 26, 2012

Sewing project: quilted potholders

Potholders
If you're looking for DIY gift ideas, potholders are a great option!

To mkae this Christmas gift, I Googled "potholder tutorial" and found absolutely tons of them. So many that I became somewhat overwhelmed and decided to just kind of wing it. So I'm not going to link a particular tutorial, but believe me, they're out there.

But to be honest, you don't really need a tutorial if you've ever made a quilt. I had the basic idea of how to make a potholder, I just needed to know how much batting to put in the middle. I also liked looking at all the tutorials (especially if you Google it as an image search) just for inspiration.

So, all I needed to buy for this project was 100% cotton batting. Polyester will melt. I used three layers of the cotton. Some people use some kind of batting (I forget the name) with a metal content for the middle layer, but I wanted mine to remain microwaveable.

This was my first time trying the "stacked blocks/bricks/books/bolts" block. I totally recommend making potholders for experimenting with different quilt blocks! It's also a simple way for some scrap busting.

I cut all three layers of batting, my backs or bottoms, and my two quilt blocks to be slightly larger than 8" by 8". I don't remember how long I cut the handle/hook thingy.

To construct these two potholders, I basically made an inside-out quilt sandwich and stitched around the edge. Then turned it right side out, then stitched around the edge again, then did some different quilting in rainbow thread. It worked OK, but I think next time I make potholders, I'll use bias-bound edges instead.

So, super-quick and easy, and a great last-minute DIY gift idea. I'm even planning on making some for my own kitchen.

Monday, November 19, 2012

DIY cowboy bandanna pillow (from an upcycled souvenir scarf!)

DSC01395
I fell in love with this vintage bandana as soon as I spotted it in the thrift shop! Amazing, bright, saturated colors, a retro cowboy theme (love that as a ranch girl), and it was a souvenir scarf. I love me some vintage souvenirs.

Seeing as I'm not fixin' to hold up a stagecoach any time soon, I don't have much use for a bandana. Somewhere along the line I decided to turn it into a throw pillow.

It had a couple of tiny holes I didn't notice until I got it out of the shop, but I would've bought it anyway. The first step was to patch the holes. I don't have a detail picture of this, but I like how it turned out. I used some of the red paisley print last seen here, cutting tiny squares just slightly larger than the holes. I also cut out fusible interfacing large enough for the entire bandana, which actually took two pieces. When I fused the interfacing to the bandana, I just made sure the fabric patches lined up exactly with the holes from the underside of the bandana. Then, I sewed around the holes, so they ended up looking kind of like a reverse applique. You can barely notice them on the finished pillow cover, but I think they look kind of cute in that worn cowboy bandana kind of way.
Bandanna pillow
To finish things up, I cut two rectangles of muslin for a split back and did the edges in a bias tape. Sorry, I didn't take pics of the back; I was so enamored with the front. I don't remember what size pillow form this is,  but it's pretty big and a perfect fit.

The pillow ended up living in my son's bedroom because that's the only room with this color scheme. Plus, I actually think it goes quite well with the rest of the retro theme working in there, including the retro robots and some other 1950s-style cowboy stuff.

The quilt the pillow is sitting on was made for me as a baby, I should've shared pictures of the front of it too as it's quite sweet.

Does Google Chrome not know how to spell? Because it keeps wanting me stick a third "N" in bandana. I started worrying I spelled it wrong in the picture! I didn't, right?

This project is linked at:
House of Hepworths, Momnivore's Dilema, Somewhat Simple, Katie's Nesting Spot, Seven Thirty-Three, The 36th Avenue, Artsy Fartsy Mama, Sew Can Do, Craft O Maniac, Sumo Sweet Stuff, Making the World Cuter

Friday, May 4, 2012

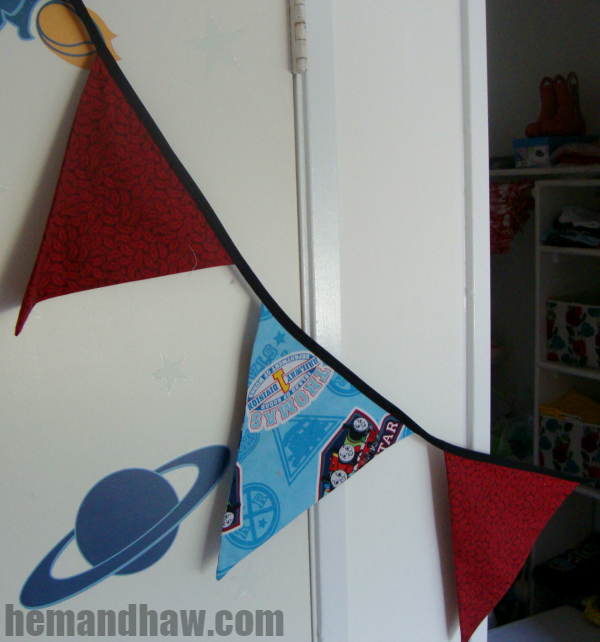
DIY Thomas & Friends birthday party bunting (fabric)

Here's some Thomas & Friends birthday bunting I made for my son's first birthday party!

Here's the method I used:
  • I did some light math and determined how many triangles I wanted, how far apart, and how large they should be.
  • Based on those measurements, drew and cut out my Isosceles Triangle pattern.
  • Cut out twice as many triangles as I wanted to end up with, so that each would have a front and back.
  • Sewed down each of the longer two sides, right-sides together.
  • Turned them right-side out and pressed.
  • Pinned and sewed them into double-fold bias tape, using a wide zig-zag.
I used a red paisley fabric I inherited from my Grandma. I was hoping it would  give off a train engineer's bandanna vibe, but truthfully, it was the only red in the stash. I also bought a yard of the only Thomas cotton that Jo-Ann's had, only to later find some Thomas the Train fat quarters on clearance at WalMart. (Both the fat quarters and the extra fabric from this bunting ended up being used in his first birthday quilt.)


Comments system

Disqus Shortname