Showing posts with label craft ideas. Show all posts

Wednesday, December 17, 2014

Salt Dough Ornaments

I don't get those DIY blogs that have a fancy "themed" Christmas trees every year, with new coordinating colors, or brand new ornaments. What do they do with all the ornaments they've made, collected, or been gifted? Keep them in storage? That's no fun.

That said, I was a little bummed when I saw how my these salt dough ornaments were turning out last year, once my then-2-year-old started mixing up the paint I'd laid out for him. They were turning out that olive green/brown/khaki color that happens when every paint color ever gets thrown into the mix. I remarked to my sister that we were going to have the ugliest tree ever this year thanks to these monochromatic ornaments.

We painted them on Christmas Eve last year, so once they were dry, they were packed up until we took them out again this year. But when we opened the ornament box the day after Thanksgiving, inspiration struck. Glitter saves everything.

I hit all of the painted salt dough ornaments with a couple blasts of Rustoleum "Intense Shimmery Finish" in gold, and, like magic, I all of a sudden loved these ornaments (which had started to grow on me anyway, I mean, my baby painted many of them!)

We strung them up on some butcher's twine (a.k.a. a fancy word for white and a colored strand of string twisted together) found in Target's Dollar Spot section. Thank goodness, too, because our tree would be pretty bare if it weren't for the addition of these ones. I think our theme is "sentimental."
How to Make Salt Dough Ornaments and Handprint Ornaments:
Dough ingredients:
One part water
One part salt (pretty sure you need to use iodized salt, i.e. not Kosher salt)
Two parts flour

Mix together ~10 minutes to form a soft dough. Roll out to desired thickness and use cookie cutters or butter knives to cut out shapes.

Once we got a couple of handprints of each of the kids, we cut circles around those and use rubber stamps to spell their names and the year, pressing the stamps into the dough. Then we let the 2-year-old go to town on the rest of the dough, treating it like Play-Doh. He used his Play-Doh cookie cutters, which gave us shapes of fish, flying saucers, and birds. He also pressed some of his Cars toys into the dough.

We used a straw to cut little hanger holes in the top of each ornament, then popped all of the ornaments into the oven on cookie sheets and baked them at 200* until they seemed nice and firm.

A couple of days later we painted them using acrylic craft paints. I painted the handprints solid white and filled the names in with a gold paint pen. Those ones were sealed with Modge Podge.

Then we had a painting party to paint the rest of the shapes, which didn't come back out again until this year!

Sunday, December 14, 2014

Wedding Invitation Ornament

Awesome DIY gift idea for bride and groom
This is why I could never be a pro blogger: this is a project from last year.

I knew I wouldn't get this DIY gift idea posted in time for Christmas, so I thought, I'll just hang on to the pictures for next year. And, holy crap, it's already next year.

Am I the only person who feels guilty throwing things like wedding invites away? I mean, they spent so much money on it! I don't keep a scrapbook, and even if I did, why would I want someone else's wedding invite in it? And they presumably already have their own copy, so you can't just, give it back. Unless! You shred it up and stick it into a glass orb!

Seriously though, this is the perfect kind of DIY gift that doesn't have that kitchy homemade vibe, and even if it does, your gift recipient only has to look at it once a year. This wedding invitation ornament was for my brother and his wife, who got married last year, and I'm pretty sure my SIL liked it a lot. Plus, since they're newlyweds, I'm sure they could use more ornaments for their tree anyway-- my husband and I have been together for 14 years and even we have a pretty bare tree.


How to Make a DIY Wedding Invitation Ornament:
Supplies:
Wedding invitation (duh!)
Clear glass (or plastic) ornament
Craft knife, cutting mat, and ruler (recommended) -or- scissors and a pen
Ribbon to hang the ornament
Other decorations such as glitter or confetti (I used a heart-shaped punch)

Method:
Just slice the invite into strips with your ruler/mat/craft knife, or cut into skinny strips with your scissors. The strips can be uniform, but I varied mine in width and made sure to get the important names and dates all on one strip.

To curl the strips, wrap them around your craft knife or pen, then stuff all the paper curls into the glass bulb. Arrange them as you go in case it gets too packed to wiggle the couple's name back to visibility.

You can leave it plain, or toss in some coordinating glitter. I punched red hearts out of the invite's envelope, and bonus! The invitation came with a bow around it, so i took the ribbon off, ironed it nice and flat, and used it as the ornament's hanger.


I think this blogger was the first to do this, and I'm so glad I found her tutorial. I'm particularly fond of these clear glass balls now, and since I had to buy a four-pack, I have three more to fill up. Although, to be honest, I don't think it's going to happen this year. ;)


Saturday, November 8, 2014

Kermit the Frog quilt

I made a quilt for my first son's 1st birthday, so I couldn't not make my second son one too...even though neither of them will remember said first birthdays!

The difference is that this quilt was made almost entirely from stash materials, I only had to buy a little bit of  navy and green leaf-print fleece, maybe a yard and a half or so, to cover the entire back.

Everything else I already had; Kermit quilting cotton from the thrift store, a jelly roll by a brand called Stripz purchased on clearance from WalMart, and Kermit fleece I only bought because because my dream Muppet fleece was out of stock.

This Muppet quilt ended up long and narrow, just like my string-bean shaped baby-- kind of in-between toddler and twin sized.

I still hate how much static electricity fleece generates, but I'm starting to warm to it because I find it so darn easy to work with.

The top is just a random, er, "design" I came up with (I just sewed strips and slashed here and there until it resembled a rectangle). There is no batting, but I decided this will be my last quilt that I do that.

For the quilting I did double random lines, my first time trying random line quilting. Also my first time using spray basting and I am a total convert! In fact, I'm thinking of going back and re-doing my two other most recent quilts to eliminate puckering...


Tuesday, November 4, 2014

DIY Catwoman Mask


Happy late Halloween!

I love sharing my random Halloween creations with you, even though it's usually after Halloween.

This year for the first time ever, my kids ended up with totally storebought costumes, which I had mixed feelings about. I prefer DIYing at least part of their costumes (cheaper, more sentimental, can use it more than once, no one else will have it, etc), but at least Halloween costumes today are cooler than the plastic tunic-and-mask combos from when I was a kid.

My three-year-old orchestrated everyone's costumes this year. He chose Spider-man for himself, Incredible Hulk for his baby bro, Catwoman for me, and Ironman for my husband. (Shhh, I won't tell him Catwoman is the wrong "franchise" if you won't. Yes, are people in my FB feed who care about this kind of thing.)

It was the first time in years that I got to dress up, and even though I didn't get to make my kid's costumes, I did do somewhat of a DIY Catwoman costume for myself.


Catwoman is a very easy Halloween costume, and there is a lot of inspiration to choose from-- 60s TV show Catwoman, 90s Tim Burton Catwoman, comic book Catwoman, Halle Berry or Anne Hathaway Catwomen. I was leaning toward the 60s one but really, I just threw a bunch of stuff together.

I'd planned on making black leggings but ended up wearing black skinny jeans, black boots, a black long-sleeved tee, and a storebought cat-eye shaped mask that I found at Spirit. The DIY Catwoman Ears were the only thing I ended up making...
  • I used black felt from Jo-Ann and bought enough I could experiment with it.
  • This is my inspiration and this is the tutorial I vaguely followed for the hat part, minus all the steaming and felting.
  • I cut three pieces for the hat part; a long strip and two vaguely half-circle shaped pieces, which I cut freehand.
  • Stitch together using this tutorial.
  • To get that widow's peak look, I just put my hat on and drew the outline I wanted, or the shape of the hat I wanted, with fabric pencil.
  • I trimmed along the outline (while the hat was folded in half so that it ended up symmetrical).
  • Since I had just cut away some of the stitching, I sewed a seam around the hat, about 1/8" of an inch from the edge, to keep it from coming apart.
  • For the ears, which did end up looking more Batman than Catwoman, I cut out four triangles, sewed them right-sides together down the top two sides, and turned them.
  • I stitched the ears to the hat along the third side of the triangle that previously had no stitching, but I did have to do a small bar tack at the base of each ear on the opposite side of the sewing to get them to stand up.
There you have it! A vaguely DIY Catwoman hat which actually looks more Batgirl because of the ears, but I think it gets the point across! Now we're in full-on holiday mode around here.

Friday, August 29, 2014

DIY French Memo Board tutorial

For some reason I felt especially accomplished with this post. I think it's because I wasn't just stashbusting and using up spare craft supplies, I was also fulfilling a need we had.
For as long as we've lived here, I was planning on putting a bulletin board over the bookshelf in our boys bedroom to hold mementos like postcards, ticket stubs, and birthday cards. After consulting with Google on searches like "boys bulletin board", I figured one of those ribbon bulletin boards, or "French Memo Boards" as I learned they're called, was just the ticket.
I especially loved that I got to use a super-fun comic book themed Star Wars fabric-- getting it out of the stash, and on display on the wall. I also harvested a stretched canvas from an unused flannel board (pro-tip: just ignore those little tutorials out there that tell you to use flannel as the base for your felt-boards. USE FELT.)

I did have to buy a couple of things: ribbon and buttons. Both were on sale but unfortunately now I have to use up the rest of those. Everything else came from the stash.
Yay to getting projects ticked off the list! Yay to using up stuff that's otherwise just sitting in a drawer! (See what I mean about this week's sense of accomplishment?)

Have you made one of these ribbon bulletin boards before? They're actually super easy and can be done in an afternoon-- which, of course, added to the I'm gettin' stuff DONE feeling. I made a How to Make a French Memo Board tutorial video if you'd like to try one:

Friday, July 25, 2014

DIY Superhero Cape from an Upcycled T-shirt


In this week's YouTube video, I show you how to make a superhero cape out of an old T-shirt. This is a super easy and fast project with satisfying results. All you really need is an adult-sized t-shirt and some scissors-- everything else is optional!

Two weeks in a row with projects for son. I'm about to lose my "Selfish Seamstress" cred!

Wednesday, June 19, 2013

DIY Utensil Bouquet

I plan to do a round up post in the future with all of my favorite somewhat-homemade and DIY gift ideas, so I thought I'd post one of my favorites so far.
A utensil bouquet makes a great housewarming, bridal or baby shower gift, or maybe even wedding gift if you go really over the top with it. As you can see,  it's basically a gift basket made to look like a bouquet, or in my case, a pot of flowers. It can take an inexpensive or ho-hum gift like utenstils and make it more memorable or visually appealing.

I simply purchased a flower pot, some utensils from her registry, and some dish towels to match her kitchen's color scheme. I used floral tape, shish-ka-bob skewers, and turned the dish towels into flowers. Then I just arranged everything in the flower pot to look like a bouquet. Some paper crinkle grass/gift basket filler (what is that stuff called?) holds everything up nicely. And I almost forgot; I lined it with some coordinating tissue paper first, standing it up a little around the sides. Ribbon finishes it off.
utenstil boquet
For a baby shower, you can use baby washcloths and onesies to make the flowers, and things like bottle scrubbers could also make up the bouquet... while kitchen timers and measuring cups tied to the side would look adorbs for the new bride or as a house warming gift.

What about you, do you prefer to DIY your gifts?

Wednesday, November 14, 2012

Orange pomanders: an instant gratification craft

Or should I call it "instant craftification"?
Actually, making an orange pomander isn't technically an instant gratification craft, because you're supposed to let them dry out for as much as eight weeks in a paper bag before enjoying them. I don't know if the smell is supposed to get stronger after that, or what. Or maybe it's supposed to dry out better that way.

Either way, mine already smell great and look pretty cute too. I'm breaking the rules and letting mine dry out in the open; that's how I roll, yo!

Different variations of the pomander have been around since at least the Middle Ages, as they apparently came in handy for disguising body stank. Modern orange pomanders are basically oranges with some cloves stabbed in them. I decided to title this post "instant gratification" for that reason; no stitching, no gluing, no planning, cutting, painting. Just a gal and her produce. And spices. (Although all that stabbing can be time consuming; I did these three over the span of three evenings.)

Most orange pomander instructions have you start out by decorating your citrus with yarn, or whatever you feel like. Then they have you stab holes with a knitting needle. I was not going to wreck any needles for this, so I used a shish-ka-bob skewer, and it worked very well... until I realized I didn't need to pre-poke the holes. The cloves stabbed in quite easily on their own!

Many instructions have you either drop your completed pomander in a paper bag with some spices and shake it around to coat; I thought mine was too delicate. You can also roll yours around in a spice mixture, and I tried this (I used pumpkin pie spice) for my first one, but thought it looked "dirty". So the next two don't have any additional spices.

Finally, I read at least one recommendation to finish the pomander off with a preserving essential oil, like sandalwood; I skipped this as well, so mine ended up being basically some oranges with fabric tied around them and cloves stabbed in them. Easy-peasy! Or easy-orangey?

Have you made pomanders before? I totally recommend this festive and easy craft!

Tuesday, October 30, 2012

DIY Muppet Fascinator Halloween costume tutorial

fascinator muppets
Muppet obsession, much?

I wanted something subtle and understated this Halloween. And you know who I think of when I think "subtle" and "understated"?
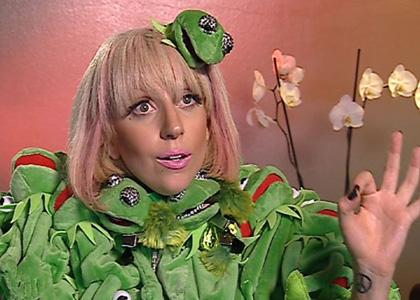
Psych! I'd actually forgotten about the Lady Gaga Kermit outfit when I dreamed up this Kermit the Frog fascinator. I was reminded once I did an image search for "Kermit hat" for inspiration on how to attach the eyes.

So, this could always be a last minute Gaga costume, even though hers is the whole head, and this tutorial is for the mouth up.

You could also try this tutorial for many other Muppets, as long as you choose one who has their eyeballs closer to the top of their head. For instance, Cookie Monster, Animal, or Elmo may work, whereas Miss Piggy, Fozzie, or Big Bird wouldn't.

This took me just a few hours to make, and that included the time it took to photograph this tutorial AND with a toddler underfoot. What's more, most of the supplies came from my stash! Keep reading to learn how to make a silly, last minute Muppets Halloween costume.


MATERIALS NEEDED:
  • Muppet colored felt
  • Constrasting felt for the underside. I used red to represent Kermit's mouth, but could've chosen pink for his tongue, or a lighter green for his spikey things around his neck.
  • Green tulle (optional). Check the remnant bin, otherwise buy the smallest amount possible, typically 1/8th of a yard. Lighter green felt to add in a couple of his neck spikes (is there a proper term for those things?) is another option, and an alternative to the veil.
  • Narrow elastic.
  • White fabric (I used cotton flannel but more felt would work)
  • Black fabric paint or marker.
  • Tiny amount of fiberfill (not pictured), I thought I had some in my stash and didn't, so I ended up using cotton balls!
  • Fabric glue.
  • Your typical sewing supplies including thread, straight pins, scissors, iron, machine, etc.
First, we need to make the patterns. We need two circles, a larger one for the main portion of the hat, and a smaller one for the eyeballs. The hat does not need a seam allowance if you're using felt or another non-fraying fabric, but the eyeballs do. For that reason, choose something larger than you want the eyeballs to end up. The hat portion will also end up slightly smaller. I used a toddler bowl, and a lid from one of those big spice containers from Costco.

Trace the larger circle for your fascinator pattern.

For the eyeball pattern, you need to measure your smaller circle at the widest part. Mine was 2.25 inches. Make a rectangle with one side measuring that length, and the other side about two inches long.

Now you can use your circle to add a rounded edge to your rectangle. Place your circle on one of the sides that matches your diameter, and trace.

Now you can cut out your patterns and pin them to your felt, fur, flannel/cotton, etc. Obvies, the big circle goes on the felt, and that basketball court shaped thing goes on your eyeball fabric.

Don't forget to cut FOUR eyeball pieces. Two pieces will be sewn together to make one eyeball. I accidentally only cut two to begin with.

Just one green and one red (or whatever colors you're using) is needed, one for the top and one for the bottom of the hat.
Fold either your shell or your lining in half, and in half again, so you're holding a rounded rectangle.

Take your scissors and snip up to the center.

Unfold it. Here, I snipped a little further past the center. I did this because Kermit's head is more oval shaped if you look at it from above. I guess a guitar pick shape is a good way of describing it. I wanted the fascinator to reflect this, and be a little more oblong as opposed to round. I probably only cut another 3/4ths of an inch.

Then, I moved the scissors over slightly and cut out a piece of pie. I wish I had an exact measurement for you, but I really just eyeballed this. The wider you make your triangle, the more dimensional your hat will be. A smaller triangle will make a flatter hat.

Use your pie piece as a pattern on your other large circle. Looks like a martini olive! Cut out a same-sized piece of pie on this circle as well. This way the lining and the shell will be perfect matches.

Now we have two PacMans and a couple of ghosts for them to gobble!

In one of your large circles, line up the edges where you removed the piece of pie. If your material has a right and wrong side, it should be right sides together. Stitch it closed, I used a very tiny seam allowance here.

Starting about half of the way up your eyeball, stitch around the curved edge with right sides together. I think I used a 1/2 or 3/8 inch seam allowance here. I trimmed the allowance and clipped my curves. I used pinking shears on mine, which is totally unnecessary.

Now we have the world's first, and presumably last, Christmas colored yarmulkes. Turn your eyeballs right side out and press, and if your felt lets you, press the yarmulkes too. If you're using fur, you'll probably have to use a pin to pick some of the pile out of the seam on the right side.

Time to draw or paint on the pupils. Kermie has slanted minus signs with ovals over them, kinda shaped like the planet Saturn. If you're making Cookie Monster, don't forget: he's cross-eyed.

My fabric pen bled through to the back! Make sure to stuff a temporary piece of paper or cardboard in the eyeball to prevent this from happening to you.

My ink required heat setting as well.

Time to make some slits in the top part of the hat for the eyeballs. I used my son's Cookie Monster for a reference. The seam on the hat goes down Kermit's nose.

I don't have any exact measurement for you as to where to place the slits. I, again, just kinda "eyeballed" it (wocka wocka), and it also depends on which Muppet you're making. Just make sure to place both slits the same distance away from the nose seam.

I did make my slits 1/2 inch smaller than the finished width of my eyeball, so they don't slip out easily. You can see what I mean in the next picture...

Poke the eyeballs up into the slits. They don't have to positioned perfectly at this time, there's still opportunity for adjustment.

Now cram them full of stuffing, poking the fill up through the slit and into the main part of the eyeball. The more full they are, the better. I used about four cotton balls per eyeball and think they could stand even more filling.

Make any final adjustments to the eyeballs on the right side. Flip the hat back over and it's time to get gluing. The parts of the eyeballs we didn't seam shut will now act as tabs to keep the eyeballs in place.

Glue all four "tabs" and press firmly. I recommend a fabric glue that does not required heat setting, since the felt doesn't agree with pressing so much. Alternatively, you could stitch them, but I didn't want any stitching to show on top.

Time to gather the tulle and make the veil.

I cut a rectangle and scrunched it up on both ends and pinned one long side and the two scrunched up sides to the wrong side of the top of the hat. The pins have to be on the right side, however; you don't want them sewn inside the lining!

If you're adding Kermit's spikes as an alternative to the tulle, I would cut about three long triangles and pin them to the rear of the fascinator.
Also, cut a piece of elastic to the size of your head, but with plenty of stretch so it'll stay on. Pin that in place as well, with the ends of the band on either side of the hat. I'm wearing mine in the pictures around the back of my head, with the elastic hidden in my hair (but you can see it in some of the pictures if you need a reference).

Stitch all around the edge of hat in the proper thread colors, I think my seam was just 1/4 inch. Make sure to hold any tulle, or other decorations, and your elastic out of the way so it doesn't get caught in the seam!

fascinator kermit
Now put on your best p-p-p-poker face and enjoy! Happy Halloween and send me pics if you make your own Muppet fascinator!

Wednesday, October 24, 2012

DIY shutter chalkboard and message center

shutter messaging
We have a bunch of shutters in our garage thanks to my husband's job as a window coverings installer. As you can imagine, we're trying to come up with ideas for vintage window shutter crafts so we can put all these vintage shabby shutters to good use.

Some of the shutters are in better shape than others, so for this project, Lance took a couple that had the louvers falling out, and knocked them the rest of the way out. Then he added a board painted with chalkboard paint to the back, and Bob's your Uncle, a shutter chalkboard is born. These two were painted with spraypaint and distressed, but mostly just because we didn't want to put a white shutter on a white wall.

We hung one shutter message board horizontally in the entryway, and the other vertically in the kitchen. (Recognize the quote from the green one? It's from Ratatouille!) The remaining louvered side can be used to display postcards, greeting cards, bills, or children's artwork, attached with clothespins.

Friday, July 20, 2012

Thomas & Friends birthday party bunting (paper)

thomas the train bunting paper 1

When I saw this book for just a buck at the thrift store, I thought it should come home with us.
ttrainbook
It's one of those books that makes sounds... but this book was pretty old and beat up, so the sounds were less children's book and more creepy horror movie-- all scratchy and hard to hear.

I thought I could rescue it by giving it new life-- Thomas the Train Book Bunting! I used thrifted bias tape for the project as well.
thomas the train bunting paper 3
I actually made this one before the Thomas the Train Fabric Bunting, which is now hanging in his room. I decided that hanging this one too might be overkill, so... I'm actually going to disassemble this one and use it in a different project! This Thomas the Train book is getting more lives than a cat.

I used a fancy paper punch around the edges, which kinda gave it a Papel Picado feel.
thomas the train bunting paper 2

Thomas & Friends Book Bunting
Materials: Thomas the Train Book ($1 - thrifted), bias tape (.50 cents - thrift store), thread
Total cost: ~$1.50

Comments system

Disqus Shortname