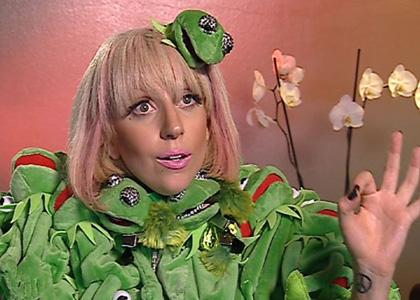
Muppet obsession, much?
I wanted something subtle and understated this Halloween. And you know who I think of when I think "subtle" and "understated"?
Psych! I'd actually forgotten about the Lady Gaga Kermit outfit when I dreamed up this Kermit the Frog fascinator. I was reminded once I did an image search for "Kermit hat" for inspiration on how to attach the eyes.
So, this could always be a last minute Gaga costume, even though hers is the whole head, and this tutorial is for the mouth up.
You could also try this tutorial for many other Muppets, as long as you choose one who has their eyeballs closer to the top of their head. For instance, Cookie Monster, Animal, or Elmo may work, whereas Miss Piggy, Fozzie, or Big Bird wouldn't.
This took me just a few hours to make, and that included the time it took to photograph this tutorial AND with a toddler underfoot. What's more, most of the supplies came from my stash! Keep reading to learn how to make a silly, last minute Muppets Halloween costume.
MATERIALS NEEDED:
- Muppet colored felt
- Constrasting felt for the underside. I used red to represent Kermit's mouth, but could've chosen pink for his tongue, or a lighter green for his spikey things around his neck.
- Green tulle (optional). Check the remnant bin, otherwise buy the smallest amount possible, typically 1/8th of a yard. Lighter green felt to add in a couple of his neck spikes (is there a proper term for those things?) is another option, and an alternative to the veil.
- Narrow elastic.
- White fabric (I used cotton flannel but more felt would work)
- Black fabric paint or marker.
- Tiny amount of fiberfill (not pictured), I thought I had some in my stash and didn't, so I ended up using cotton balls!
- Fabric glue.
- Your typical sewing supplies including thread, straight pins, scissors, iron, machine, etc.

First, we need to make the patterns. We need two circles, a larger one for the main portion of the hat, and a smaller one for the eyeballs. The hat does not need a seam allowance if you're using felt or another non-fraying fabric, but the eyeballs do. For that reason, choose something larger than you want the eyeballs to end up. The hat portion will also end up slightly smaller. I used a toddler bowl, and a lid from one of those big spice containers from Costco.
Trace the larger circle for your fascinator pattern.
For the eyeball pattern, you need to measure your smaller circle at the widest part. Mine was 2.25 inches. Make a rectangle with one side measuring that length, and the other side about two inches long.
Now you can use your circle to add a rounded edge to your rectangle. Place your circle on one of the sides that matches your diameter, and trace.
Now you can cut out your patterns and pin them to your felt, fur, flannel/cotton, etc. Obvies, the big circle goes on the felt, and that basketball court shaped thing goes on your eyeball fabric.
Don't forget to cut FOUR eyeball pieces. Two pieces will be sewn together to make one eyeball. I accidentally only cut two to begin with.
Just one green and one red (or whatever colors you're using) is needed, one for the top and one for the bottom of the hat.
Fold either your shell or your lining in half, and in half again, so you're holding a rounded rectangle.
Take your scissors and snip up to the center.
Unfold it. Here, I snipped a little further past the center. I did this because Kermit's head is more oval shaped if you look at it from above. I guess a guitar pick shape is a good way of describing it. I wanted the fascinator to reflect this, and be a little more oblong as opposed to round. I probably only cut another 3/4ths of an inch.
Then, I moved the scissors over slightly and cut out a piece of pie. I wish I had an exact measurement for you, but I really just eyeballed this. The wider you make your triangle, the more dimensional your hat will be. A smaller triangle will make a flatter hat.
Use your pie piece as a pattern on your other large circle. Looks like a martini olive! Cut out a same-sized piece of pie on this circle as well. This way the lining and the shell will be perfect matches.
Now we have two PacMans and a couple of ghosts for them to gobble!
In one of your large circles, line up the edges where you removed the piece of pie. If your material has a right and wrong side, it should be right sides together. Stitch it closed, I used a very tiny seam allowance here.
Starting about half of the way up your eyeball, stitch around the curved edge with right sides together. I think I used a 1/2 or 3/8 inch seam allowance here. I trimmed the allowance and clipped my curves. I used pinking shears on mine, which is totally unnecessary.
Now we have the world's first, and presumably last, Christmas colored yarmulkes. Turn your eyeballs right side out and press, and if your felt lets you, press the yarmulkes too. If you're using fur, you'll probably have to use a pin to pick some of the pile out of the seam on the right side.
Time to draw or paint on the pupils. Kermie has slanted minus signs with ovals over them, kinda shaped like the planet Saturn. If you're making Cookie Monster, don't forget: he's cross-eyed.
My fabric pen bled through to the back! Make sure to stuff a temporary piece of paper or cardboard in the eyeball to prevent this from happening to you.
My ink required heat setting as well.
Time to make some slits in the top part of the hat for the eyeballs. I used my son's Cookie Monster for a reference. The seam on the hat goes down Kermit's nose.
I don't have any exact measurement for you as to where to place the slits. I, again, just kinda "eyeballed" it (wocka wocka), and it also depends on which Muppet you're making. Just make sure to place both slits the same distance away from the nose seam.
I did make my slits 1/2 inch smaller than the finished width of my eyeball, so they don't slip out easily. You can see what I mean in the next picture...
Poke the eyeballs up into the slits. They don't have to positioned perfectly at this time, there's still opportunity for adjustment.
Now cram them full of stuffing, poking the fill up through the slit and into the main part of the eyeball. The more full they are, the better. I used about four cotton balls per eyeball and think they could stand even more filling.
Make any final adjustments to the eyeballs on the right side. Flip the hat back over and it's time to get gluing. The parts of the eyeballs we didn't seam shut will now act as tabs to keep the eyeballs in place.
Glue all four "tabs" and press firmly. I recommend a fabric glue that does not required heat setting, since the felt doesn't agree with pressing so much. Alternatively, you could stitch them, but I didn't want any stitching to show on top.
Time to gather the tulle and make the veil.
I cut a rectangle and scrunched it up on both ends and pinned one long side and the two scrunched up sides to the wrong side of the top of the hat. The pins have to be on the right side, however; you don't want them sewn inside the lining!
If you're adding Kermit's spikes as an alternative to the tulle, I would cut about three long triangles and pin them to the rear of the fascinator.
Also, cut a piece of elastic to the size of your head, but with plenty of stretch so it'll stay on. Pin that in place as well, with the ends of the band on either side of the hat. I'm wearing mine in the pictures around the back of my head, with the elastic hidden in my hair (but you can see it in some of the pictures if you need a reference).
Stitch all around the edge of hat in the proper thread colors, I think my seam was just 1/4 inch. Make sure to hold any tulle, or other decorations, and your elastic out of the way so it doesn't get caught in the seam!

Now put on your best p-p-p-poker face and enjoy! Happy Halloween and send me pics if you make your own Muppet fascinator!